> ## Documentation Index
> Fetch the complete documentation index at: https://docs.kaptured.ai/llms.txt
> Use this file to discover all available pages before exploring further.
# How to Add a Product
> Add a product with its photos, views and details so you can generate photoshoots of it.
A **product** is one item from your catalog, such as a kurta, a ring or a chair, with 1 to 4 photos. Every photoshoot starts from a product, so this is the first thing to set up.
The Free plan allows up to **3 products**. Paid plans have no product limit.
## Step 1: Open the product form
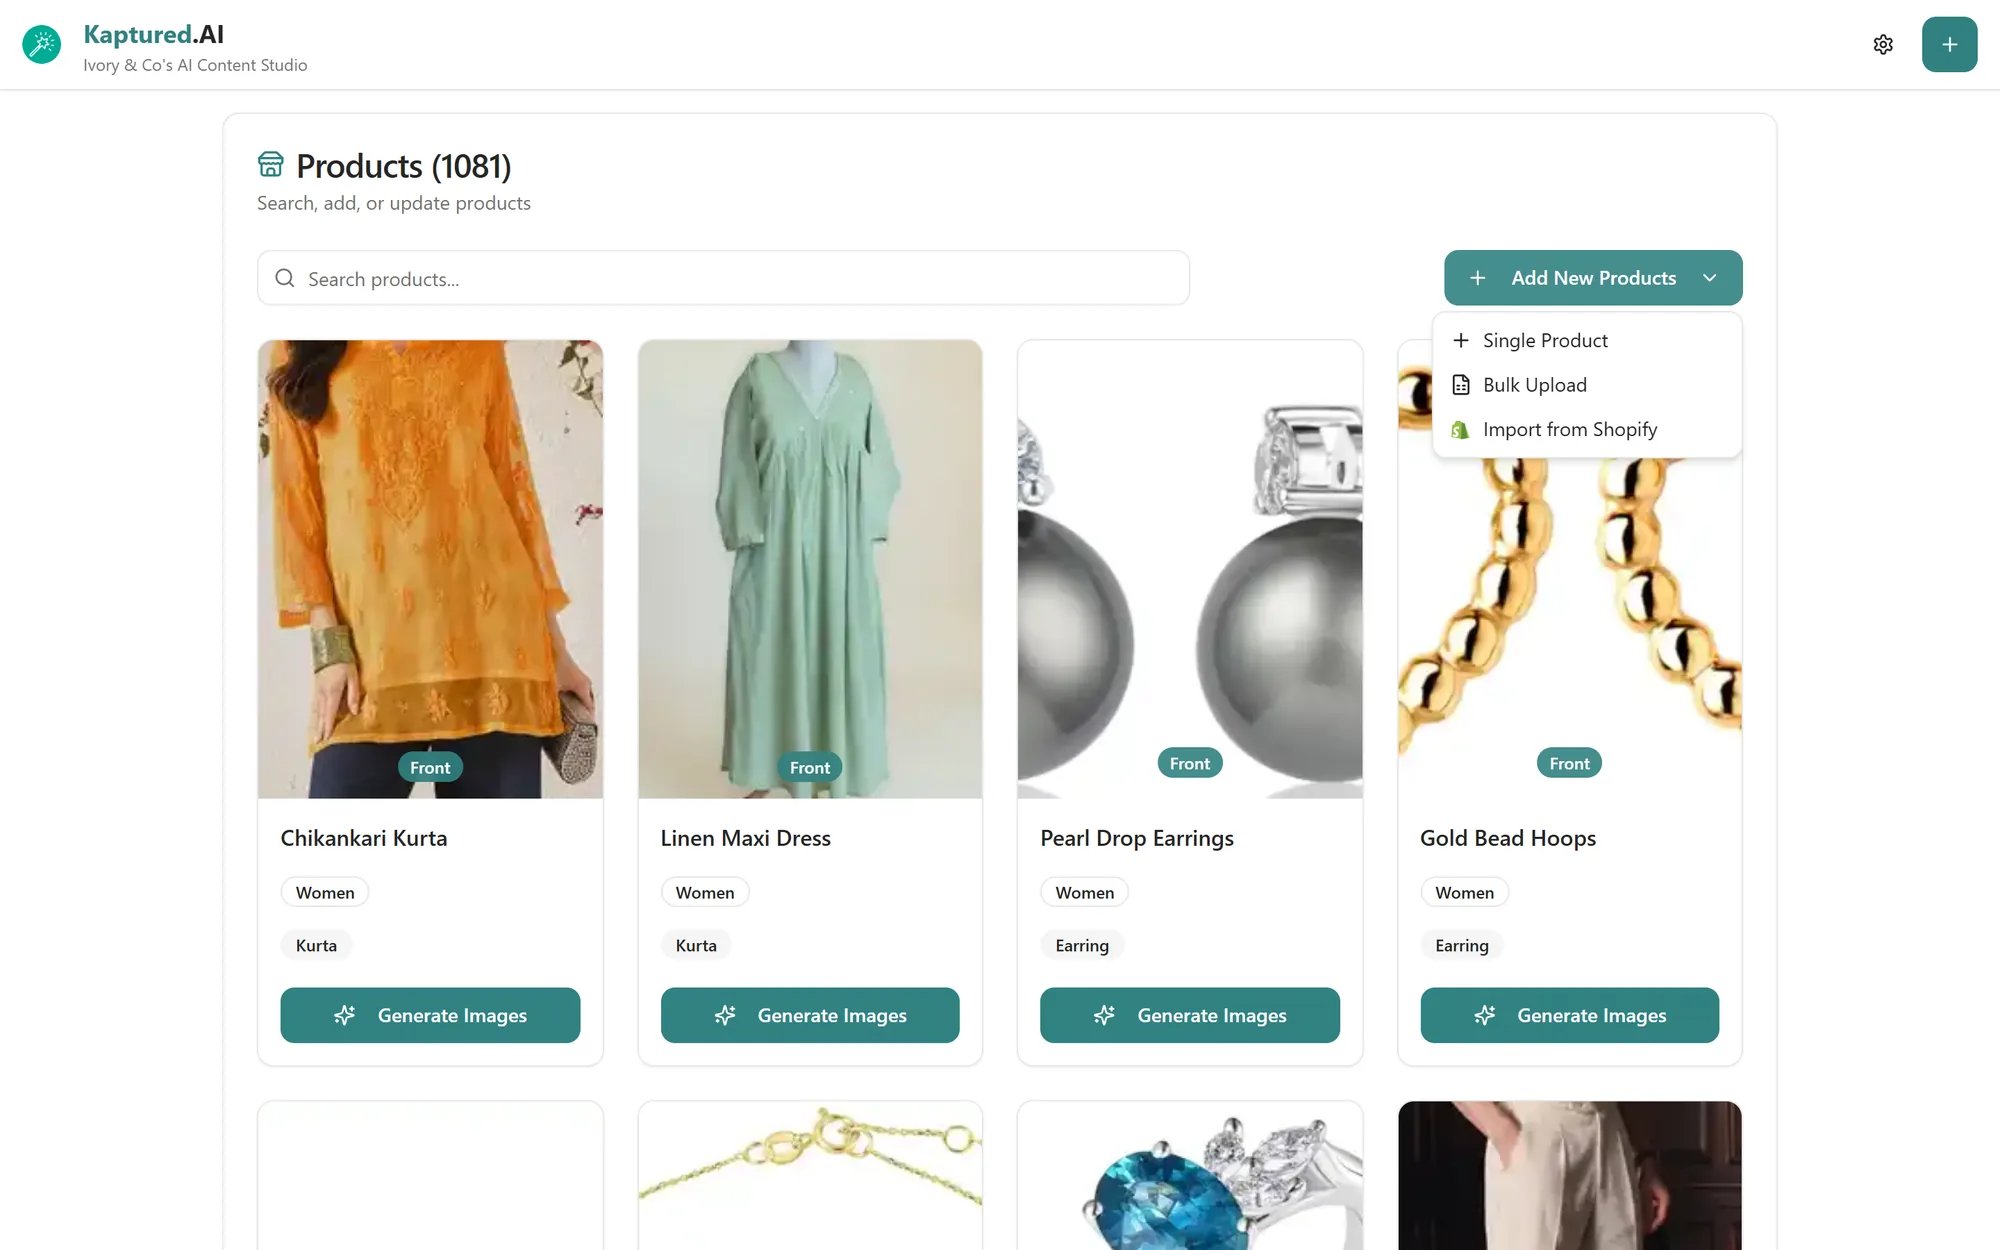
Go to **Products Management** and click **Add New Products → Single Product**.
 ## Step 2: Add photos
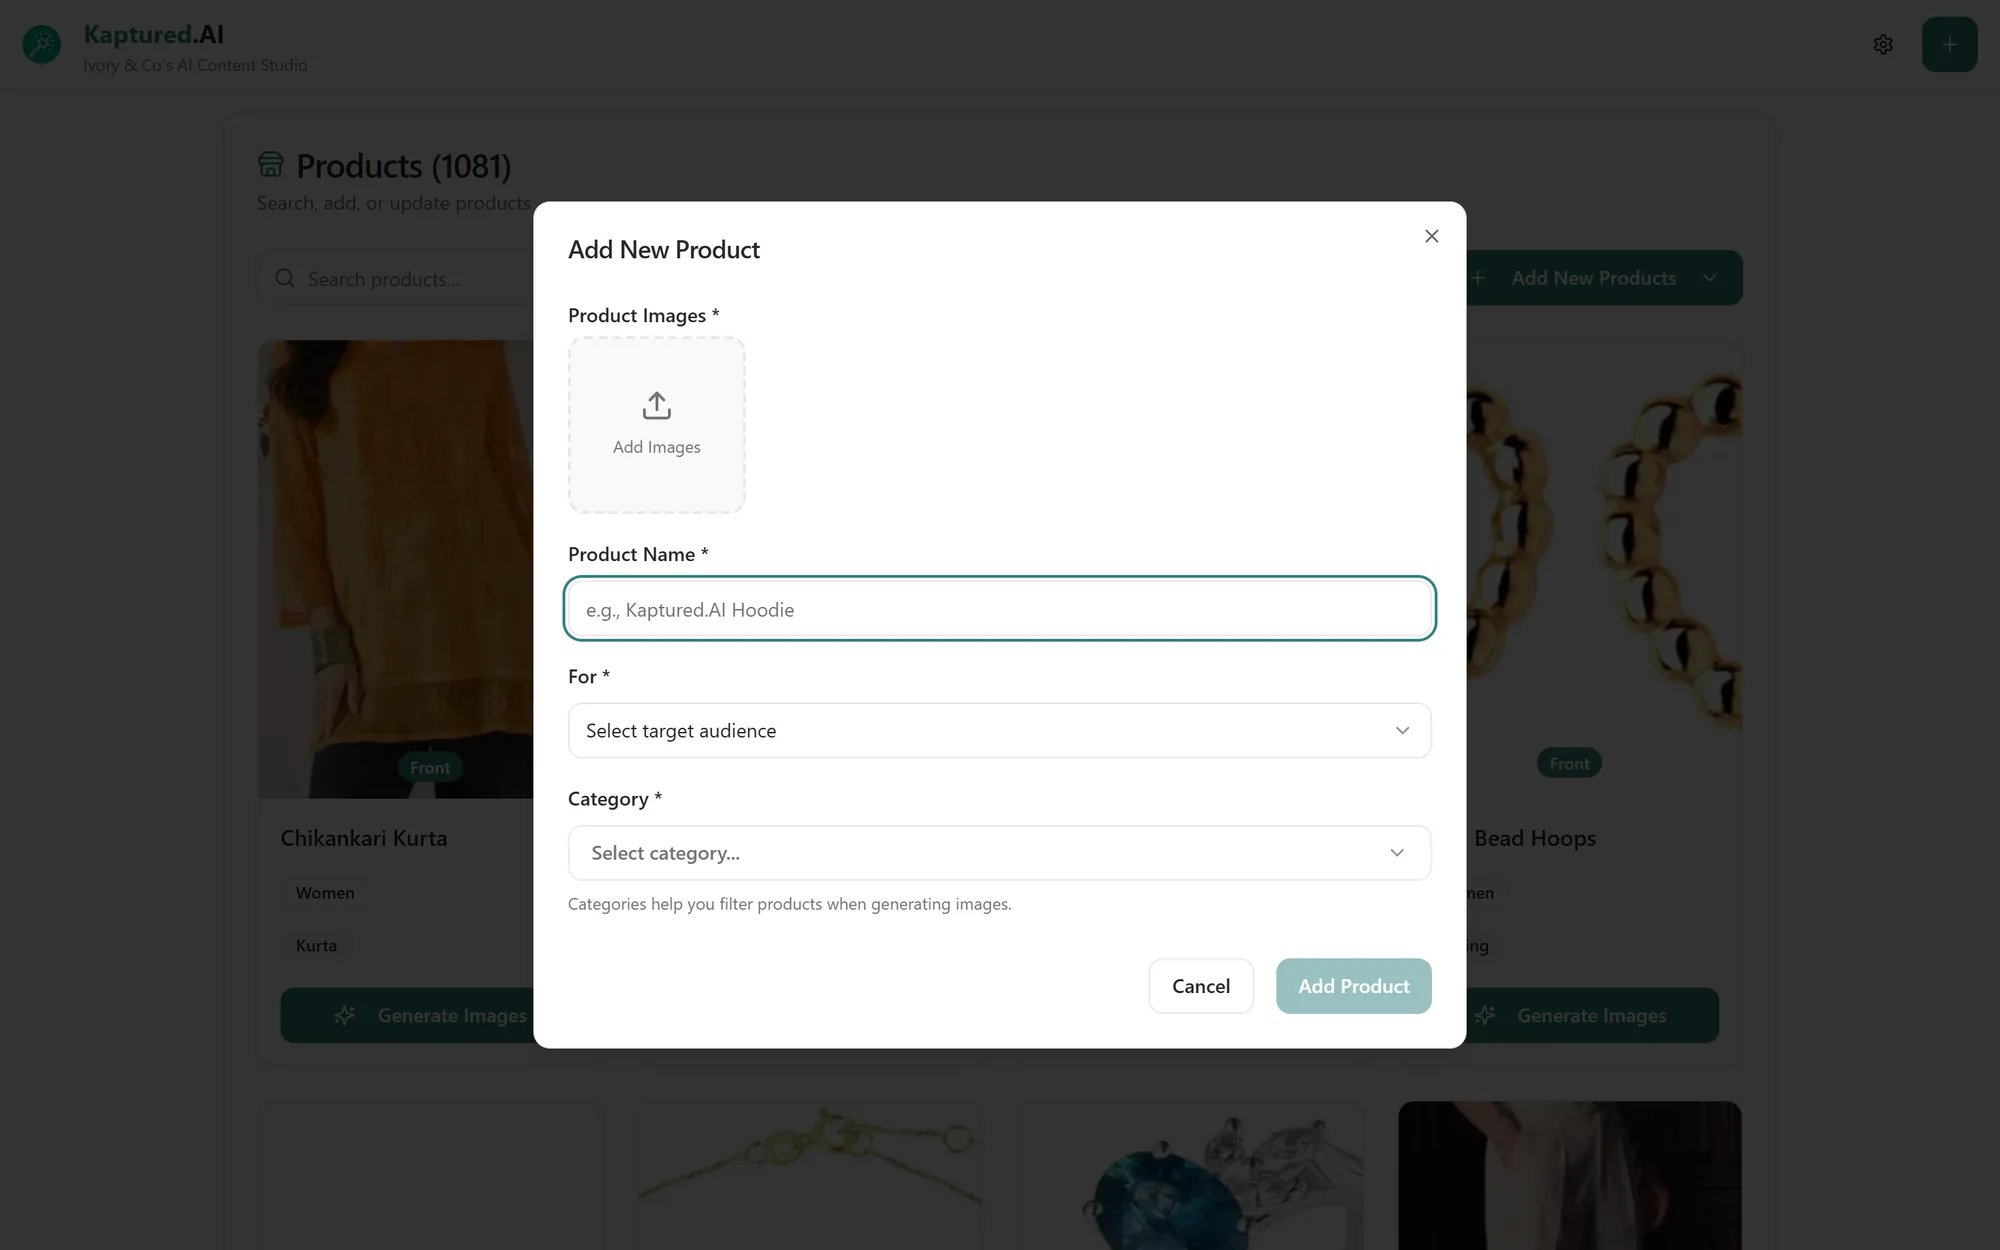
Under **Product Images**, click **Add Images**, drag photos onto the form, or paste them.
## Step 2: Add photos
Under **Product Images**, click **Add Images**, drag photos onto the form, or paste them.
 * Up to **4 photos** per product.
* JPEG, PNG, WebP, AVIF or HEIC (iPhone photos are converted automatically).
* Each photo must be under 15 MB after we optimize it.
Each photo opens in a crop dialog first:
* **Adjust:** **Rotate -90°**, **Rotate 90°**, **Flip H**, **Flip V**.
* **Smart crop:** finds the product and crops to it.
* **Erase background:** removes the background around the product.
* **Add labels:** add text labels to the photo.
Choose the photo's view, then click **Confirm Crop**. You can re-crop later by clicking the thumbnail.
## Step 3: Set each photo's view
Every photo needs a view so the AI knows what it is looking at:
| View | Use it for |
| ---------------------------------------------------------- | ---------------------------------------------------------------------- |
| **Front** / **Side** / **Back** | The whole product from that side |
| **Front Close-up** / **Side Close-up** / **Back Close-up** | Detail shots: embroidery, prints, buttons, stones |
| **Pairing Piece** | Something worn with the product, like a dupatta or the bottom of a set |
| **Size Reference** | Jewelry only: shows how big the piece is when worn |
**Tip:** Name your files with the view (for example `kurta-front.jpg`, `kurta-back.jpg`) and the view is filled in for you.
At least one photo must be **Front**, **Side** or **Back**.
### Jewelry: Set Size Reference
Jewelry shops have a **Set Size Reference** button. It places your piece on a 3D head so you can save a view that shows its real size. You need a **Front** photo first.
## Step 4: Fill in the details
| Field | Notes |
| ------------------- | ---------------------------------------------------------------------------------------------------------------------------------------------------- |
| **Product Name** \* | Up to 25 characters |
| **For** \* | Men, Women, Boys, Girls, Toddler Boys, Toddler Girls or Unisex |
| **Category** \* | Clothing and jewelry shops pick from a list (for example Kurta, Saree, Ring, Necklace). Other shops pick or type their own, up to 25 characters each |
| **Stone Type** \* | Jewelry only: Diamond, Polki, Cubic Zirconia, Pearl, Ruby, Plain gold and more. It noticeably improves accuracy |
Click **Add Product**. You see **Product added successfully**.
## Step 5 (optional): Add extra details
Open the product again with **Edit product** to fill in **Add extra details**:
* **Description:** up to 35 characters
* **Price:** in your shop's currency
* **Colors** and **Sizes:** pick from the chips or add your own
Colors, sizes and category are the filters you'll use in the studio and Library, so they are worth filling in if you have a large catalog.
## If something won't save
| Message | Fix |
| -------------------------------------------------------------- | --------------------------------------------- |
| **Product name is required** | Enter a name |
| **Please select target audience (For)** | Pick an option in **For** |
| **At least one category is required** | Pick or type a category |
| **Stone type is required for jewelry products** | Pick a stone type |
| **All images must have a category assigned** | Give every photo a view |
| **Add at least one image categorized as Front, Side, or Back** | Change one photo's view, or add a front photo |
| **You can only add up to 4 images.** | Remove a photo first |
| **Image size too large** | Use a smaller photo, or crop it tighter |
## Related articles
* [Product Photo Tips](/products/product-photo-tips)
* [Bulk Upload Products](/products/bulk-upload)
* [Managing Your Products](/products/managing-products)
* [Your First Photoshoot](/ai-photo-studio/your-first-photoshoot)
* Up to **4 photos** per product.
* JPEG, PNG, WebP, AVIF or HEIC (iPhone photos are converted automatically).
* Each photo must be under 15 MB after we optimize it.
Each photo opens in a crop dialog first:
* **Adjust:** **Rotate -90°**, **Rotate 90°**, **Flip H**, **Flip V**.
* **Smart crop:** finds the product and crops to it.
* **Erase background:** removes the background around the product.
* **Add labels:** add text labels to the photo.
Choose the photo's view, then click **Confirm Crop**. You can re-crop later by clicking the thumbnail.
## Step 3: Set each photo's view
Every photo needs a view so the AI knows what it is looking at:
| View | Use it for |
| ---------------------------------------------------------- | ---------------------------------------------------------------------- |
| **Front** / **Side** / **Back** | The whole product from that side |
| **Front Close-up** / **Side Close-up** / **Back Close-up** | Detail shots: embroidery, prints, buttons, stones |
| **Pairing Piece** | Something worn with the product, like a dupatta or the bottom of a set |
| **Size Reference** | Jewelry only: shows how big the piece is when worn |
**Tip:** Name your files with the view (for example `kurta-front.jpg`, `kurta-back.jpg`) and the view is filled in for you.
At least one photo must be **Front**, **Side** or **Back**.
### Jewelry: Set Size Reference
Jewelry shops have a **Set Size Reference** button. It places your piece on a 3D head so you can save a view that shows its real size. You need a **Front** photo first.
## Step 4: Fill in the details
| Field | Notes |
| ------------------- | ---------------------------------------------------------------------------------------------------------------------------------------------------- |
| **Product Name** \* | Up to 25 characters |
| **For** \* | Men, Women, Boys, Girls, Toddler Boys, Toddler Girls or Unisex |
| **Category** \* | Clothing and jewelry shops pick from a list (for example Kurta, Saree, Ring, Necklace). Other shops pick or type their own, up to 25 characters each |
| **Stone Type** \* | Jewelry only: Diamond, Polki, Cubic Zirconia, Pearl, Ruby, Plain gold and more. It noticeably improves accuracy |
Click **Add Product**. You see **Product added successfully**.
## Step 5 (optional): Add extra details
Open the product again with **Edit product** to fill in **Add extra details**:
* **Description:** up to 35 characters
* **Price:** in your shop's currency
* **Colors** and **Sizes:** pick from the chips or add your own
Colors, sizes and category are the filters you'll use in the studio and Library, so they are worth filling in if you have a large catalog.
## If something won't save
| Message | Fix |
| -------------------------------------------------------------- | --------------------------------------------- |
| **Product name is required** | Enter a name |
| **Please select target audience (For)** | Pick an option in **For** |
| **At least one category is required** | Pick or type a category |
| **Stone type is required for jewelry products** | Pick a stone type |
| **All images must have a category assigned** | Give every photo a view |
| **Add at least one image categorized as Front, Side, or Back** | Change one photo's view, or add a front photo |
| **You can only add up to 4 images.** | Remove a photo first |
| **Image size too large** | Use a smaller photo, or crop it tighter |
## Related articles
* [Product Photo Tips](/products/product-photo-tips)
* [Bulk Upload Products](/products/bulk-upload)
* [Managing Your Products](/products/managing-products)
* [Your First Photoshoot](/ai-photo-studio/your-first-photoshoot)