> ## Documentation Index
> Fetch the complete documentation index at: https://docs.kaptured.ai/llms.txt
> Use this file to discover all available pages before exploring further.
# Shop Settings: Name, Logo, Category and Image Engines
> Every setting on the Shop Settings page and how it changes what you generate.
**Shop Settings** controls how your shop appears and how the AI Photo Studio behaves. Open it from the profile menu. Changes apply across the app as soon as you click **Save Changes**.
## Shop Details
 ### Shop Name
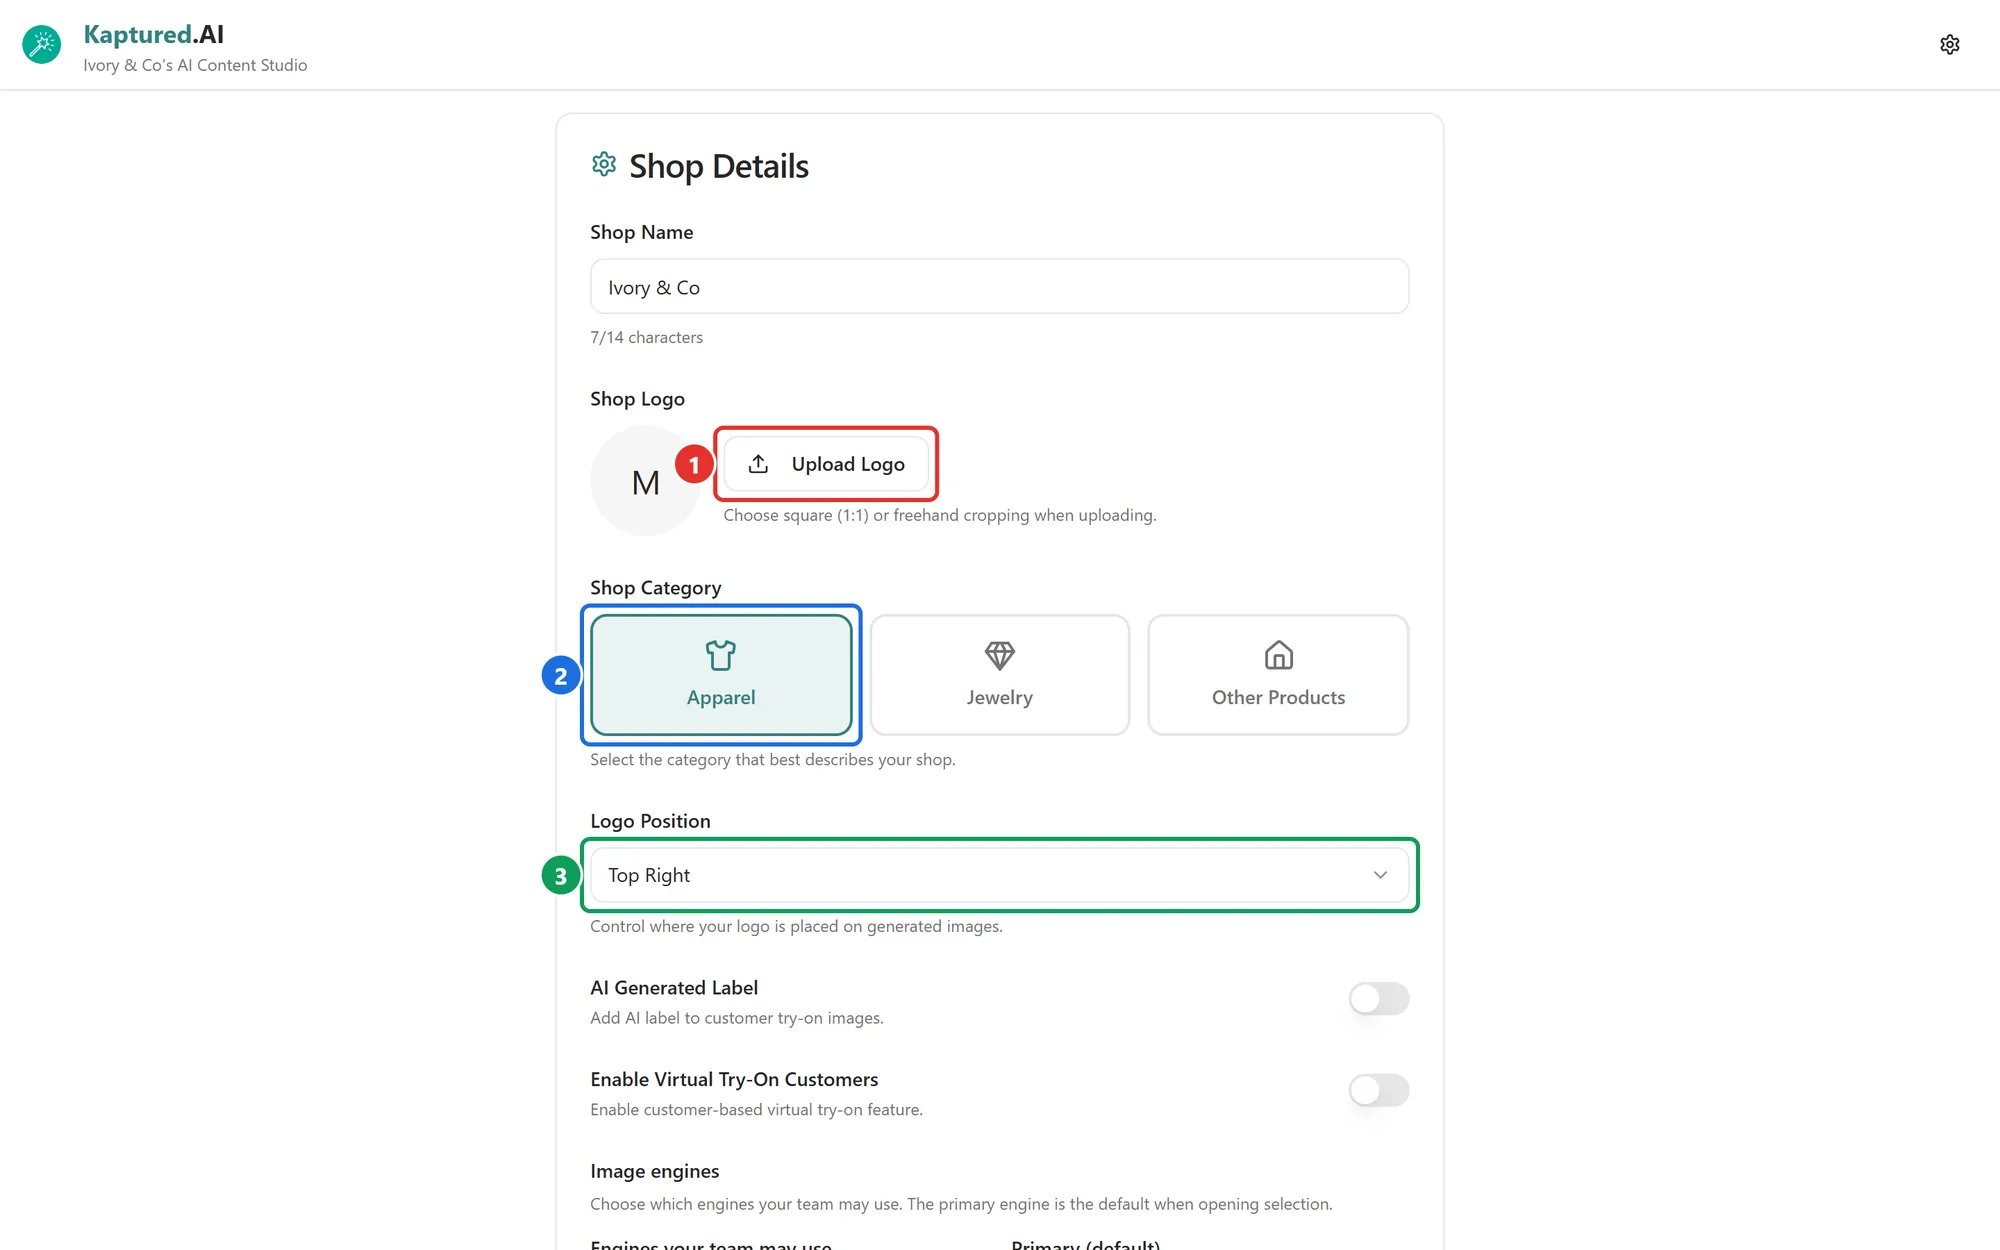
Up to **14 characters**. The counter under the field shows how many you've used. A shop name is required.
### Shop Logo
Your logo is used for the **with Logo** download options.
1. Click **Upload Logo** (1) and pick an image (JPEG, PNG, WebP, AVIF or HEIC).
2. In **Crop Logo Image**, choose a **Mode**: **Square** (1:1) or **Freehand** (any shape). The smallest crop is 100×100 pixels.
3. Click **Confirm Crop & Upload**.
The logo is saved right away; you don't need to click **Save Changes**. It must be under 2 MB after we optimize it.
Use a logo with a transparent background (PNG) so it sits cleanly on any photo.
### Shop Category
Choose the option that best describes what you sell (2). **This changes the steps in the AI Photo Studio**, so set it before you start.
| Category | Studio steps |
| --------------------- | ------------------------------------------------------------------------------------------------ |
| **Apparel** (default) | Select Apparel, Select Model, Select Background, Select Pose, Select Accessories, Final Settings |
| **Jewelry** | Select Jewelry, Select Template, Select Model, Select Accessories, Final Settings |
| **Other Products** | Select Product, Select Model, Select Pose, Select Accessories, Final Settings |
For **Other Products**, pick a type: **Furniture**, **Food Product**, **Restaurant**, **Mobile** or **Custom** (type your own, for example "electronics").
### Logo Position
Where your logo goes on **with Logo** downloads (3): **Top Right** (default), **Top Left**, **Bottom Right** or **Bottom Left**.
### AI Generated Label
When on, adds an "AI generated" label to Virtual Try-On images of your customers. Off by default.
### Enable Virtual Try-On Customers
Apparel shops only. On by default. Turns on the **Style Customers** pages. See [Styling Customers with Virtual Try-On](/customers/styling-customers). Switching to any other category turns it off.
## Image engines
Choose which image engines can be used in your shop, and which one is picked by default.
### Shop Name
Up to **14 characters**. The counter under the field shows how many you've used. A shop name is required.
### Shop Logo
Your logo is used for the **with Logo** download options.
1. Click **Upload Logo** (1) and pick an image (JPEG, PNG, WebP, AVIF or HEIC).
2. In **Crop Logo Image**, choose a **Mode**: **Square** (1:1) or **Freehand** (any shape). The smallest crop is 100×100 pixels.
3. Click **Confirm Crop & Upload**.
The logo is saved right away; you don't need to click **Save Changes**. It must be under 2 MB after we optimize it.
Use a logo with a transparent background (PNG) so it sits cleanly on any photo.
### Shop Category
Choose the option that best describes what you sell (2). **This changes the steps in the AI Photo Studio**, so set it before you start.
| Category | Studio steps |
| --------------------- | ------------------------------------------------------------------------------------------------ |
| **Apparel** (default) | Select Apparel, Select Model, Select Background, Select Pose, Select Accessories, Final Settings |
| **Jewelry** | Select Jewelry, Select Template, Select Model, Select Accessories, Final Settings |
| **Other Products** | Select Product, Select Model, Select Pose, Select Accessories, Final Settings |
For **Other Products**, pick a type: **Furniture**, **Food Product**, **Restaurant**, **Mobile** or **Custom** (type your own, for example "electronics").
### Logo Position
Where your logo goes on **with Logo** downloads (3): **Top Right** (default), **Top Left**, **Bottom Right** or **Bottom Left**.
### AI Generated Label
When on, adds an "AI generated" label to Virtual Try-On images of your customers. Off by default.
### Enable Virtual Try-On Customers
Apparel shops only. On by default. Turns on the **Style Customers** pages. See [Styling Customers with Virtual Try-On](/customers/styling-customers). Switching to any other category turns it off.
## Image engines
Choose which image engines can be used in your shop, and which one is picked by default.
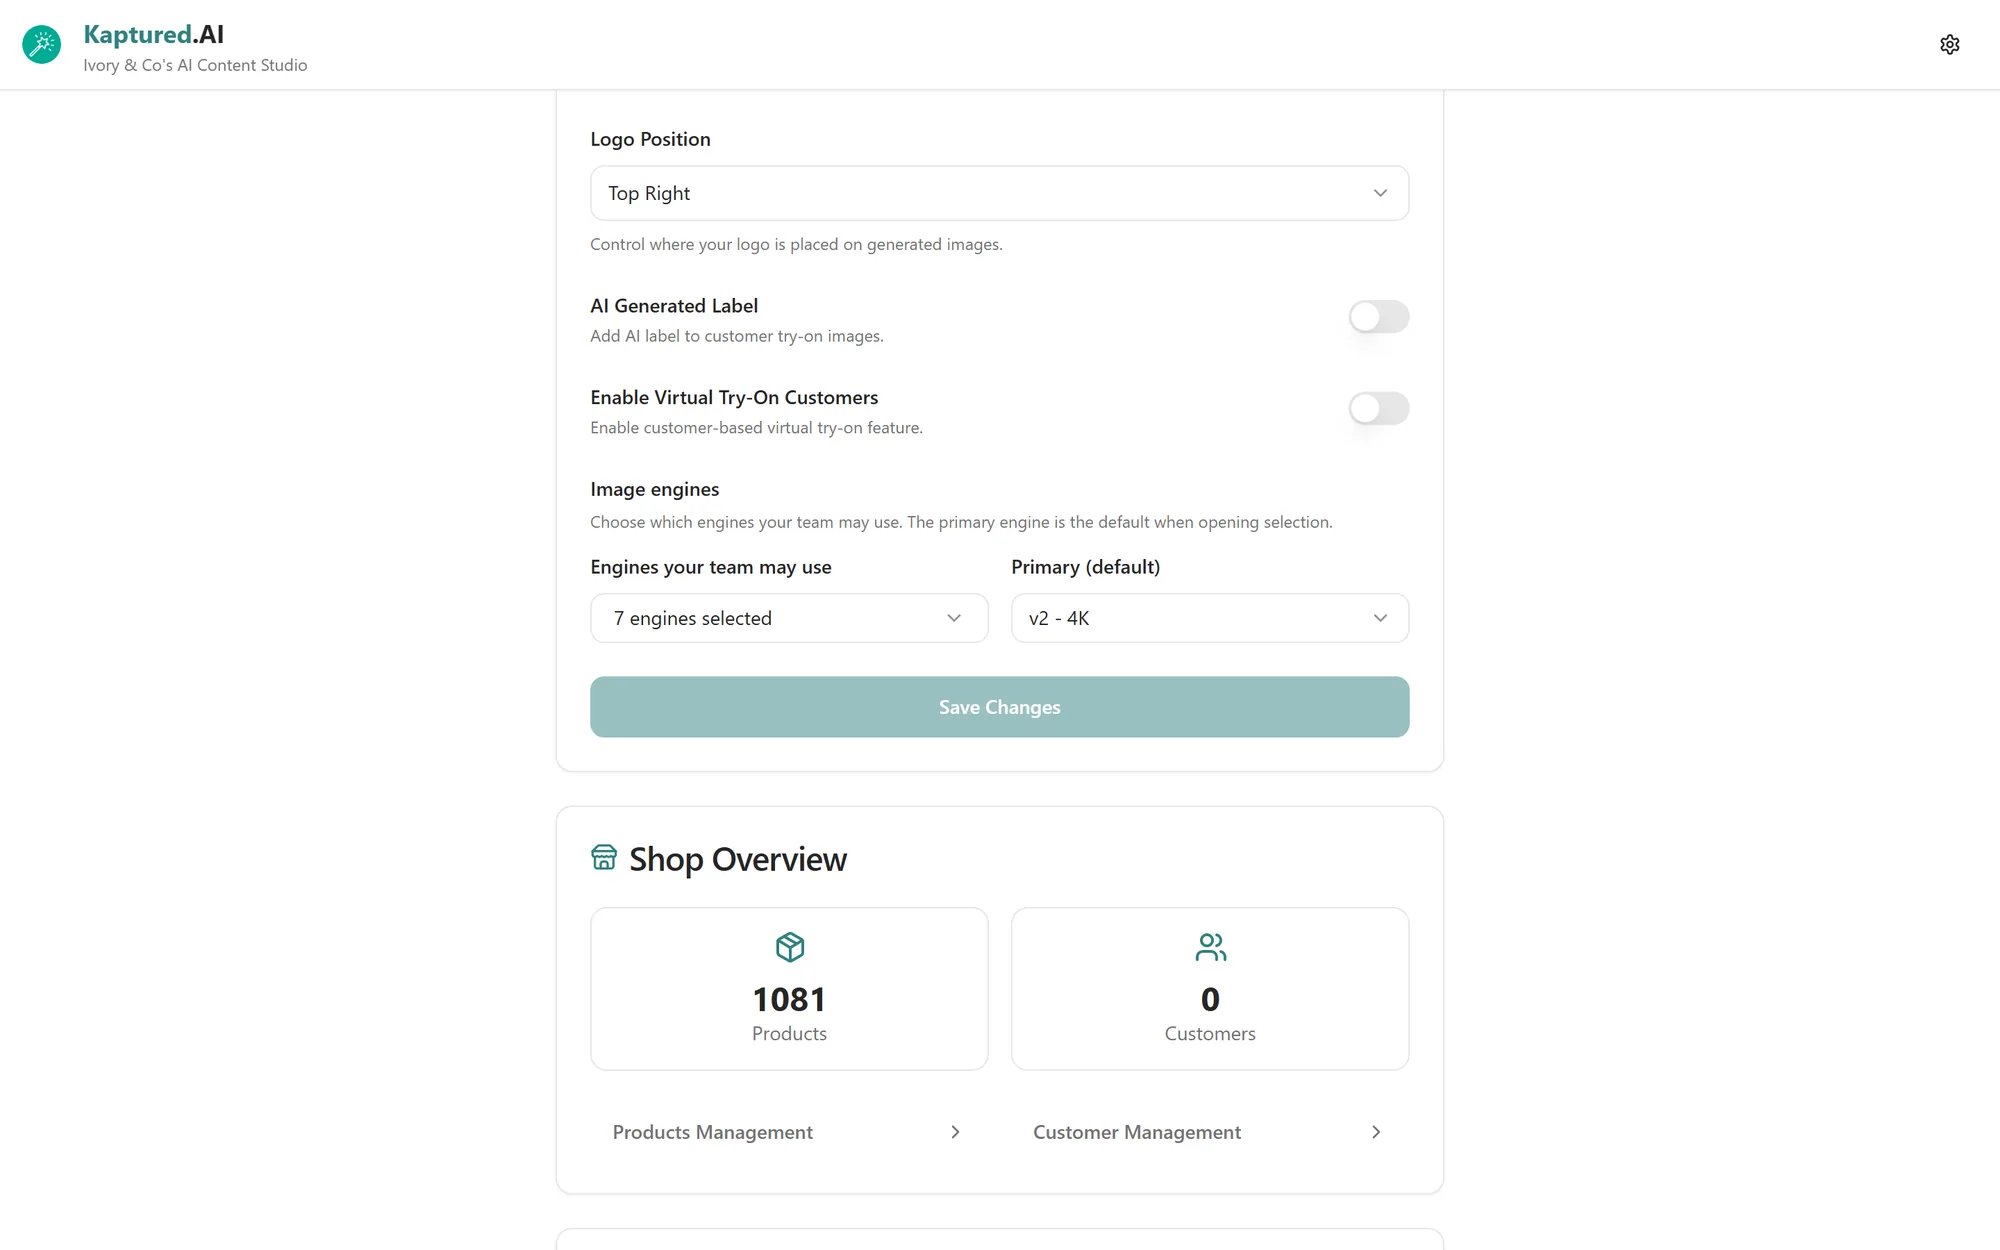 * **Engines your team may use:** a grid of engines (**v1**, **v2**, **v3**) by resolution (**1K**, **2K**, **4K**). Each allowed cell shows its cost in credits per image. Click a row or column header to toggle the whole row or column. At least one engine always stays on.
* **Primary (default):** the engine that's preselected in the studio's **Final Settings**.
Turn off engines you never want used, for example 4K, to avoid spending more credits than you meant to.
On the Free plan only **v1** is available. See [Final Settings and Image Engines](/ai-photo-studio/final-settings-and-image-engines) for how the engines differ.
## Shop Overview
Shows how many **Products** and **Customers** your shop has, with shortcuts to **Products Management** and **Customer Management**.
## Related articles
* [Final Settings and Image Engines](/ai-photo-studio/final-settings-and-image-engines)
* [How to Add a Product](/products/adding-products)
* [Downloading Images](/editing-and-video/viewer-and-downloads)
* **Engines your team may use:** a grid of engines (**v1**, **v2**, **v3**) by resolution (**1K**, **2K**, **4K**). Each allowed cell shows its cost in credits per image. Click a row or column header to toggle the whole row or column. At least one engine always stays on.
* **Primary (default):** the engine that's preselected in the studio's **Final Settings**.
Turn off engines you never want used, for example 4K, to avoid spending more credits than you meant to.
On the Free plan only **v1** is available. See [Final Settings and Image Engines](/ai-photo-studio/final-settings-and-image-engines) for how the engines differ.
## Shop Overview
Shows how many **Products** and **Customers** your shop has, with shortcuts to **Products Management** and **Customer Management**.
## Related articles
* [Final Settings and Image Engines](/ai-photo-studio/final-settings-and-image-engines)
* [How to Add a Product](/products/adding-products)
* [Downloading Images](/editing-and-video/viewer-and-downloads)