> ## Documentation Index
> Fetch the complete documentation index at: https://docs.kaptured.ai/llms.txt
> Use this file to discover all available pages before exploring further.
# Editing Images with AI: Prompts, Poses, Camera Angles and De-AI Filters
> Change a generated image with a text prompt or a one-click preset instead of generating from scratch.
Often an image is almost right. Instead of generating again, edit it: describe the change, or use a one-click preset. Edits keep the model, product and scene, and change only what you ask for.
## Edit with a prompt
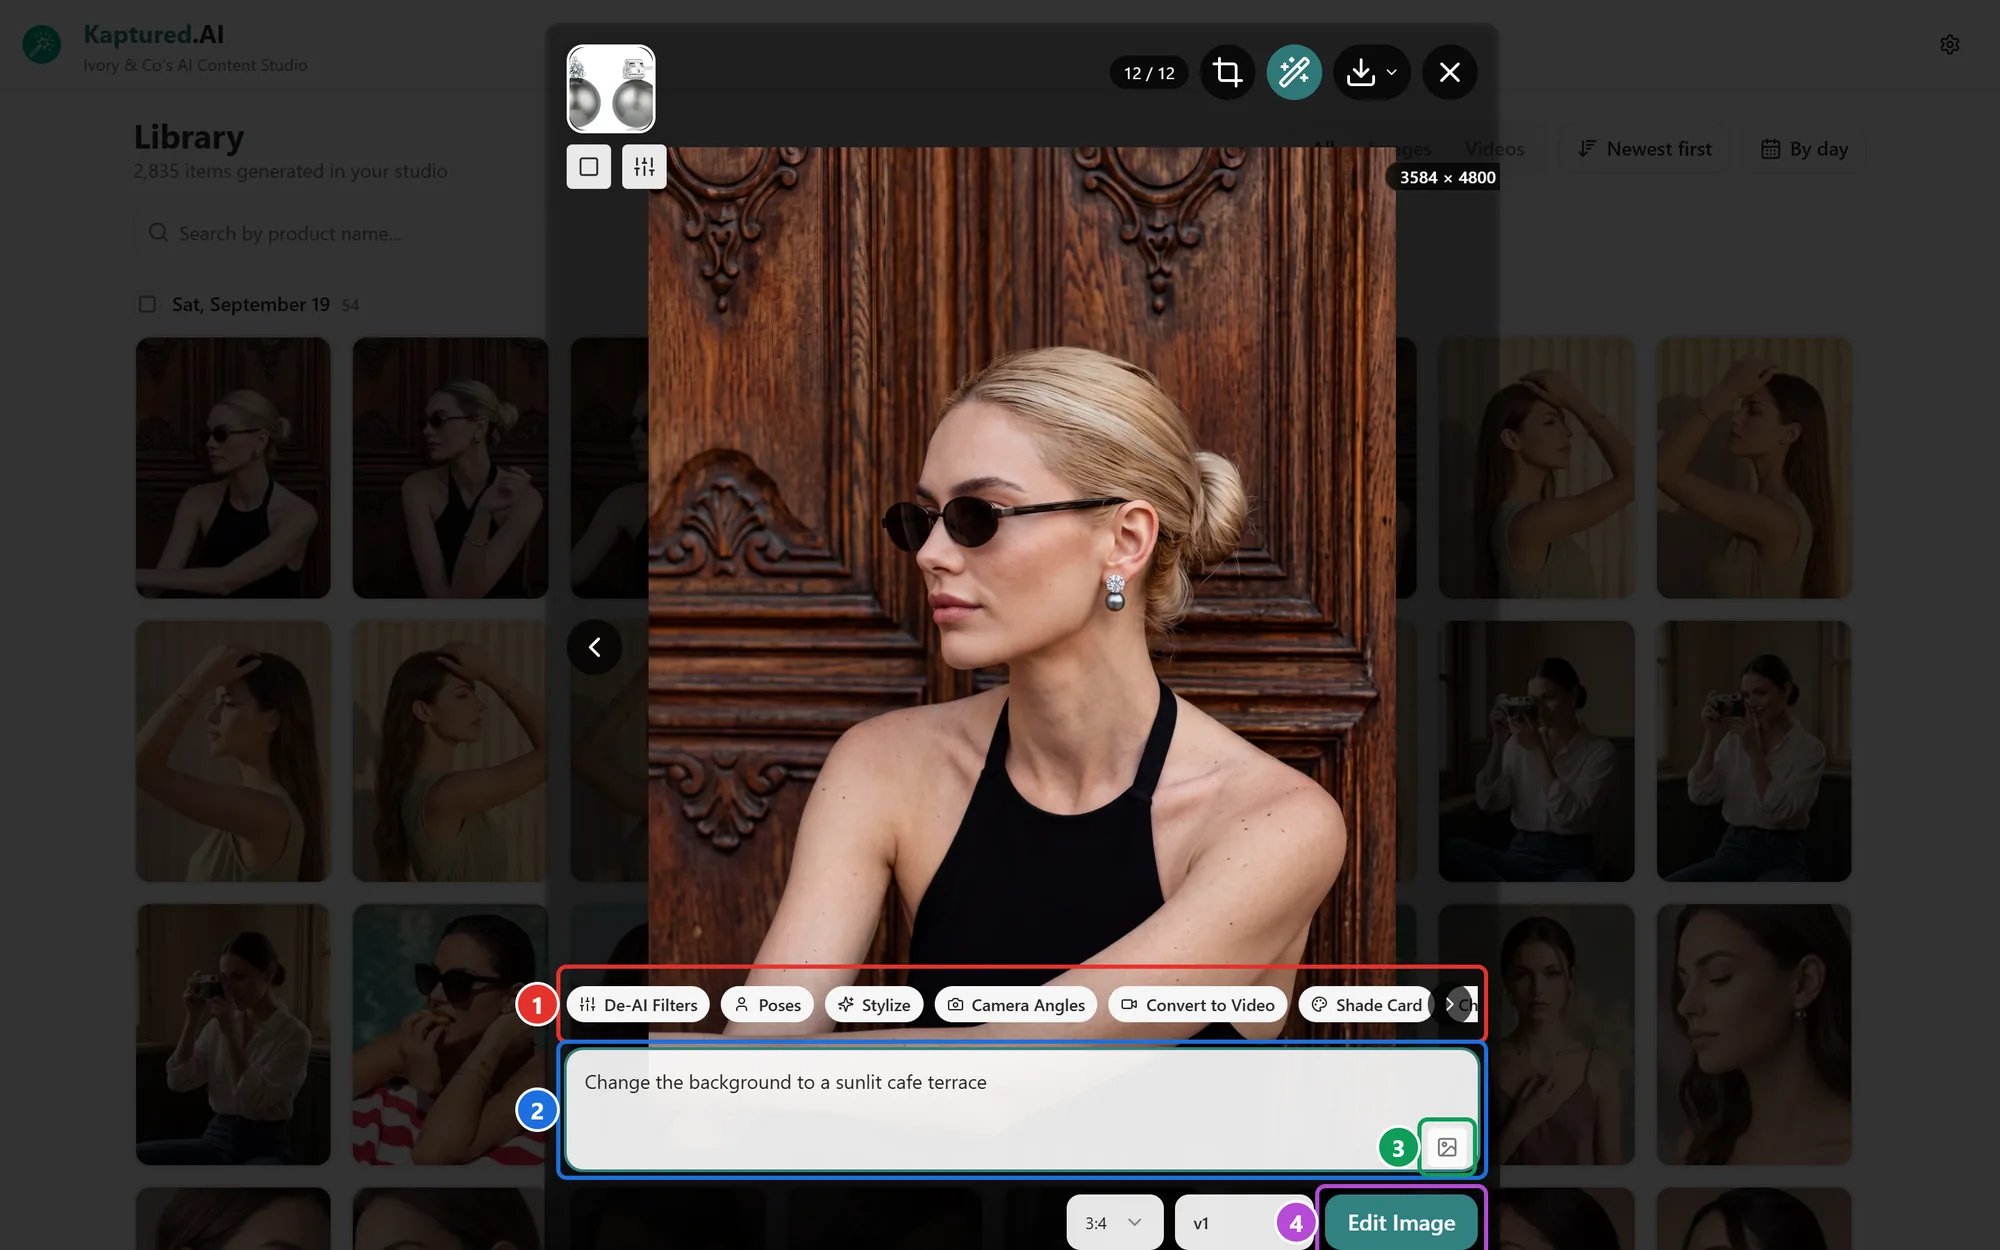 1. Open the image in the viewer and hover over it. The editing tools appear along the bottom.
2. In the prompt box (2), describe what to change, for example "change the background to a sunlit café terrace" or "add a gold watch on her left wrist".
3. To show the AI what you mean, paste a reference image into the prompt box or click **Attach image** (3).
4. Choose the **aspect ratio** and **image engine** next to the button.
5. Click **Edit Image** (4), then **Confirm Edit**.
The edited image appears as a new image. The original is kept.
**Cost:** an edit costs the same as generating one image with the engine and resolution you picked. See [Final Settings and Image Engines](/ai-photo-studio/final-settings-and-image-engines).
## One-click presets
Above the prompt box is a row of presets (1). Use the arrow at the end of the row to see more:
| Preset | What it does |
| -------------------- | ---------------------------------------------------------------------------------------------------------------------------------------------------------------- |
| **De-AI Filters** | Color grading that makes the image look like a real camera photo, less "AI" |
| **Poses** | The same model and outfit in a different pose (clothing) |
| **Stylize** | Restyle the image using a style from the styles library |
| **Camera Angles** | The same shot from a different angle or distance |
| **Convert to Video** | Turn the image into a short video. See [Convert to Video](/editing-and-video/convert-to-video) |
| **Shade Card** | Recolor the product: pick from **Preset Shades** (search "Rose Gold", "Sage" and so on) or use the **Color Picker**. Shades you use are kept under **My Shades** |
There are also quick ideas matched to the model, for example **Chair**, **Twirl**, **Lighting** or **Effect** for women's wear.
## Edit many images at once
Select several images, then click **Edit All (n)**. The same edit is applied to each one, one after another. It can take a few minutes; you can keep working meanwhile.
## Crop
**Crop image** in the viewer crops without using any credits.
## Tips
* Ask for one change at a time. "Change the background to a café" works better than a list of five changes.
* Be specific about position: "on her left wrist", "in the top right corner".
* If an edit changes the product, generate again from the product instead; edits are best for the scene and styling.
## Related articles
* [Magic Edit: Logos, Ad Designs and Saved Designs](/editing-and-video/magic-edit)
* [Convert an Image to Video](/editing-and-video/convert-to-video)
* [The Image Viewer and Download Options](/editing-and-video/viewer-and-downloads)
1. Open the image in the viewer and hover over it. The editing tools appear along the bottom.
2. In the prompt box (2), describe what to change, for example "change the background to a sunlit café terrace" or "add a gold watch on her left wrist".
3. To show the AI what you mean, paste a reference image into the prompt box or click **Attach image** (3).
4. Choose the **aspect ratio** and **image engine** next to the button.
5. Click **Edit Image** (4), then **Confirm Edit**.
The edited image appears as a new image. The original is kept.
**Cost:** an edit costs the same as generating one image with the engine and resolution you picked. See [Final Settings and Image Engines](/ai-photo-studio/final-settings-and-image-engines).
## One-click presets
Above the prompt box is a row of presets (1). Use the arrow at the end of the row to see more:
| Preset | What it does |
| -------------------- | ---------------------------------------------------------------------------------------------------------------------------------------------------------------- |
| **De-AI Filters** | Color grading that makes the image look like a real camera photo, less "AI" |
| **Poses** | The same model and outfit in a different pose (clothing) |
| **Stylize** | Restyle the image using a style from the styles library |
| **Camera Angles** | The same shot from a different angle or distance |
| **Convert to Video** | Turn the image into a short video. See [Convert to Video](/editing-and-video/convert-to-video) |
| **Shade Card** | Recolor the product: pick from **Preset Shades** (search "Rose Gold", "Sage" and so on) or use the **Color Picker**. Shades you use are kept under **My Shades** |
There are also quick ideas matched to the model, for example **Chair**, **Twirl**, **Lighting** or **Effect** for women's wear.
## Edit many images at once
Select several images, then click **Edit All (n)**. The same edit is applied to each one, one after another. It can take a few minutes; you can keep working meanwhile.
## Crop
**Crop image** in the viewer crops without using any credits.
## Tips
* Ask for one change at a time. "Change the background to a café" works better than a list of five changes.
* Be specific about position: "on her left wrist", "in the top right corner".
* If an edit changes the product, generate again from the product instead; edits are best for the scene and styling.
## Related articles
* [Magic Edit: Logos, Ad Designs and Saved Designs](/editing-and-video/magic-edit)
* [Convert an Image to Video](/editing-and-video/convert-to-video)
* [The Image Viewer and Download Options](/editing-and-video/viewer-and-downloads)