> ## Documentation Index
> Fetch the complete documentation index at: https://docs.kaptured.ai/llms.txt
> Use this file to discover all available pages before exploring further.
# Your First Photoshoot in the AI Photo Studio
> Walk through every step of the AI Photo Studio, from picking a product to your finished image.
The **AI Photo Studio** turns a product photo into a photoshoot: your product, on a model, in a setting, in a pose. This article walks through one complete run.
## How the page is laid out
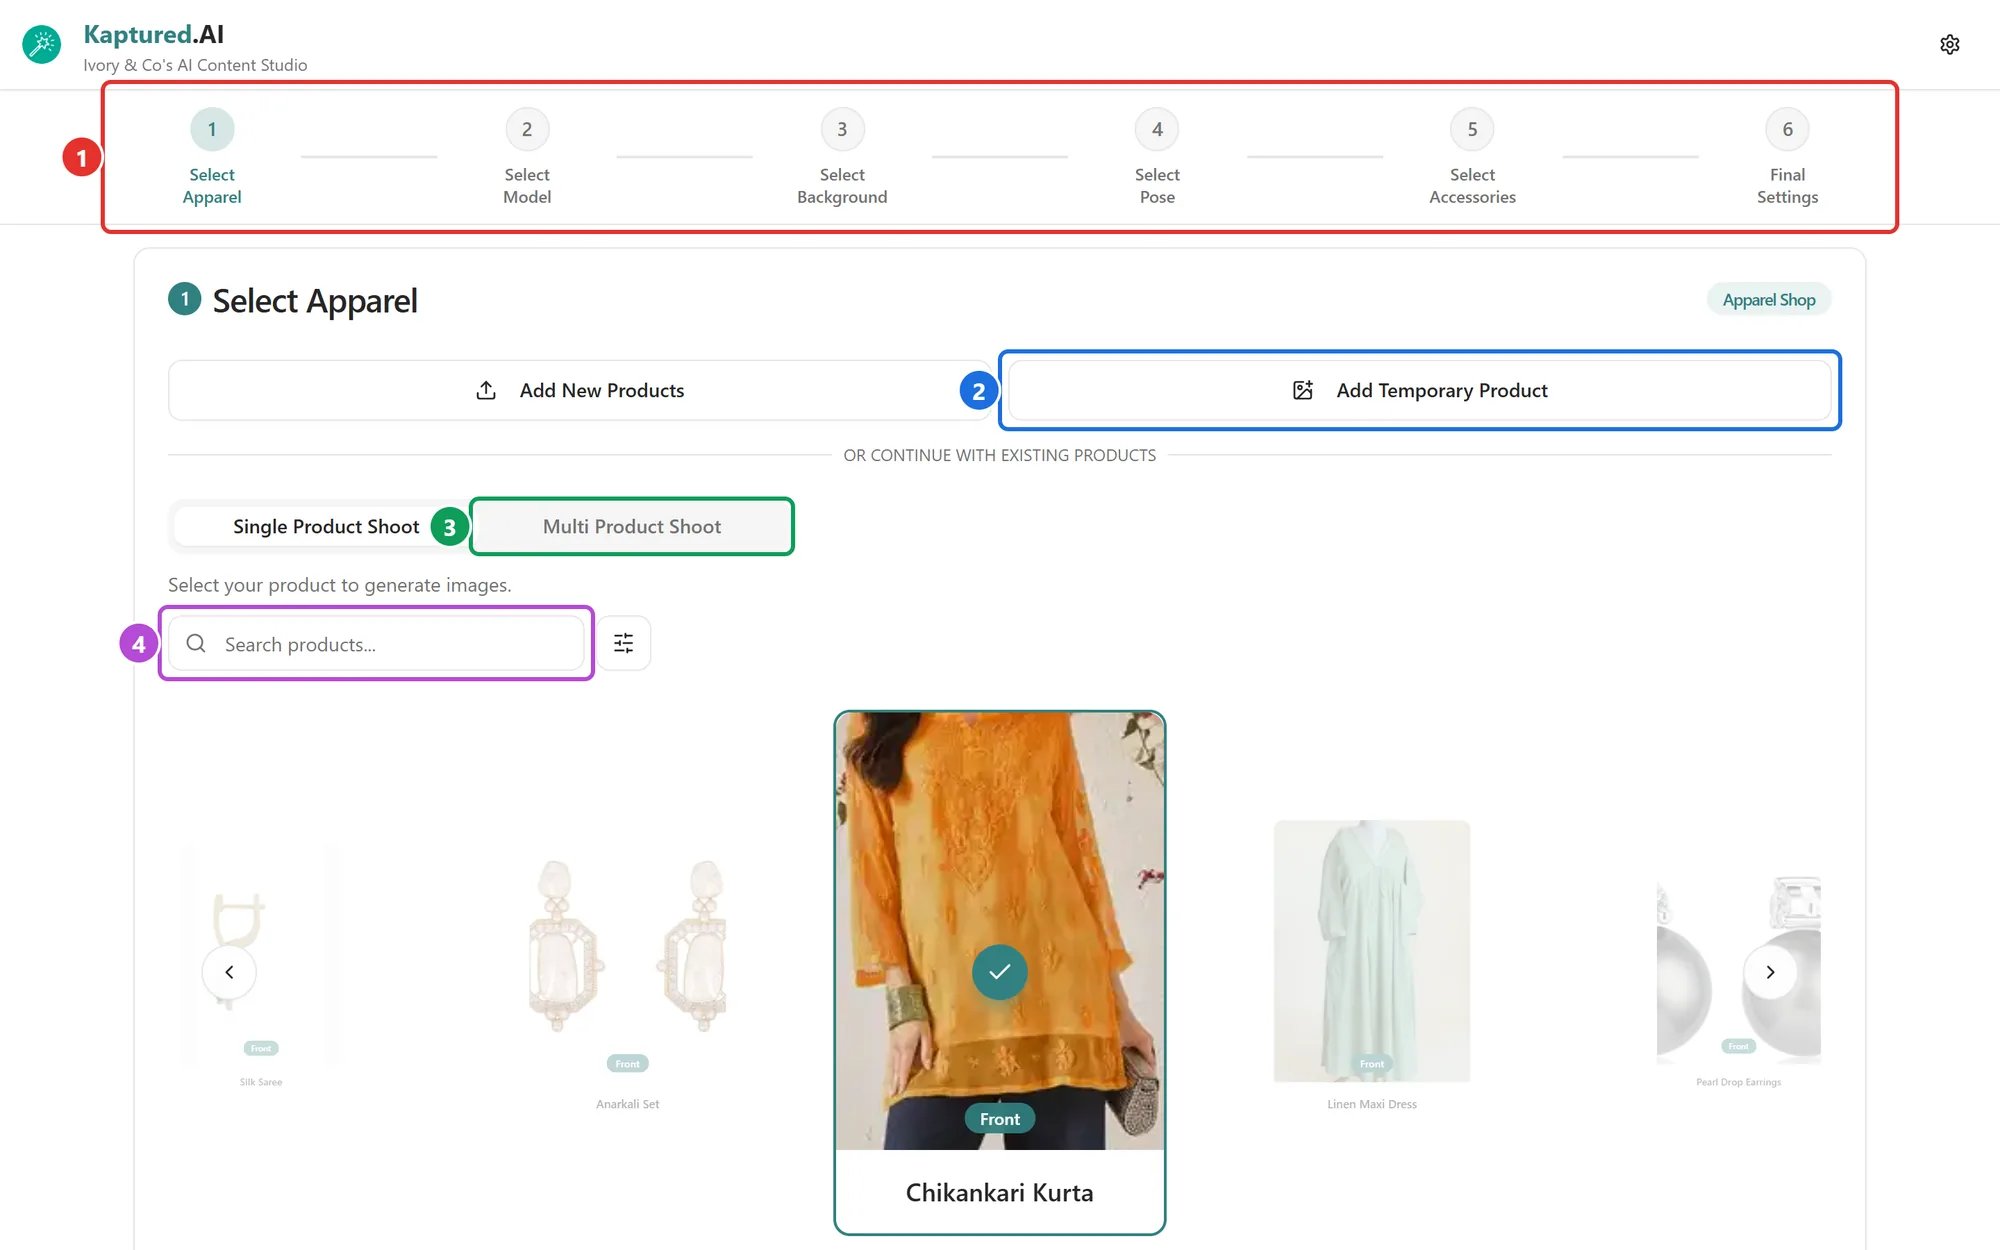 A row of steps (1) sits at the top of the page. Click any step to jump to it. Which steps you see depends on your [Shop Category](/getting-started/platform-overview/shop-settings#shop-category):
| Shop | Steps |
| -------------- | ----------------------------------------------------------------------------------------------------- |
| Apparel | Select Apparel → Select Model → Select Background → Select Pose → Select Accessories → Final Settings |
| Jewelry | Select Jewelry → Select Template → Select Model → Select Accessories → Final Settings |
| Other products | Select Product → Select Model → Select Pose → Select Accessories → Final Settings |
Under the steps is **Generations**, where your results appear.
## Step 1: Select your product
Choose **Single Product Shoot** and click a product. You can search with **Search products...** (4), filter by category, color or size with the filter button, or jump to your newest with **Go to Latest Product**.
To shoot up to 3 products together on one model, use **Multi Product Shoot** (3). See [Group Shots](/ai-photo-studio/group-shots).
### Try a product without saving it
Click **Add Temporary Product** (2), choose photos, then fill in **Product Name**, **For** and **Category** in **Temporary product details**. Temporary products work like normal ones in the studio but aren't saved to your catalog.
## Step 2: Select a model
Pick a face from the model library (filter by **All**, **Male**, **Female** or **Kids**), let the AI choose, or upload your own. Adjust age, hairstyle and makeup under **Face Styling**. See [Choosing a Model](/ai-photo-studio/choosing-a-model).
## Step 3: Select a background (clothing)
Browse around 90 backdrops in **Studio**, **Outdoor**, **Festive** and **Indoor**, describe one in words on the **Text** tab, or upload your own. See [Backgrounds and Poses](/ai-photo-studio/backgrounds-and-poses).
Jewelry shops pick a **Template** here instead. See [Jewelry Templates](/ai-photo-studio/jewelry-templates).
## Step 4: Select a pose
Pick a pose by view (**Front**, **Side**, **Back** and so on), use one of your saved pose styles, or describe one. Choose an expression: **Neutral**, **Smiling** or **Laughing**. See [Backgrounds and Poses](/ai-photo-studio/backgrounds-and-poses).
## Step 5: Select accessories
Add footwear, bags, earrings and more, or click **Let AI Choose Accessories**. See [Accessories](/ai-photo-studio/accessories).
## Step 6: Final settings
Choose focus, lens look, **Aspect Ratio** and **Image Engine**. The engine and resolution decide the credit cost. See [Final Settings and Image Engines](/ai-photo-studio/final-settings-and-image-engines).
## Step 7: Generate
1. Click **Generate 1 image of this {product}**. (With several engines selected, you get one image per engine.)
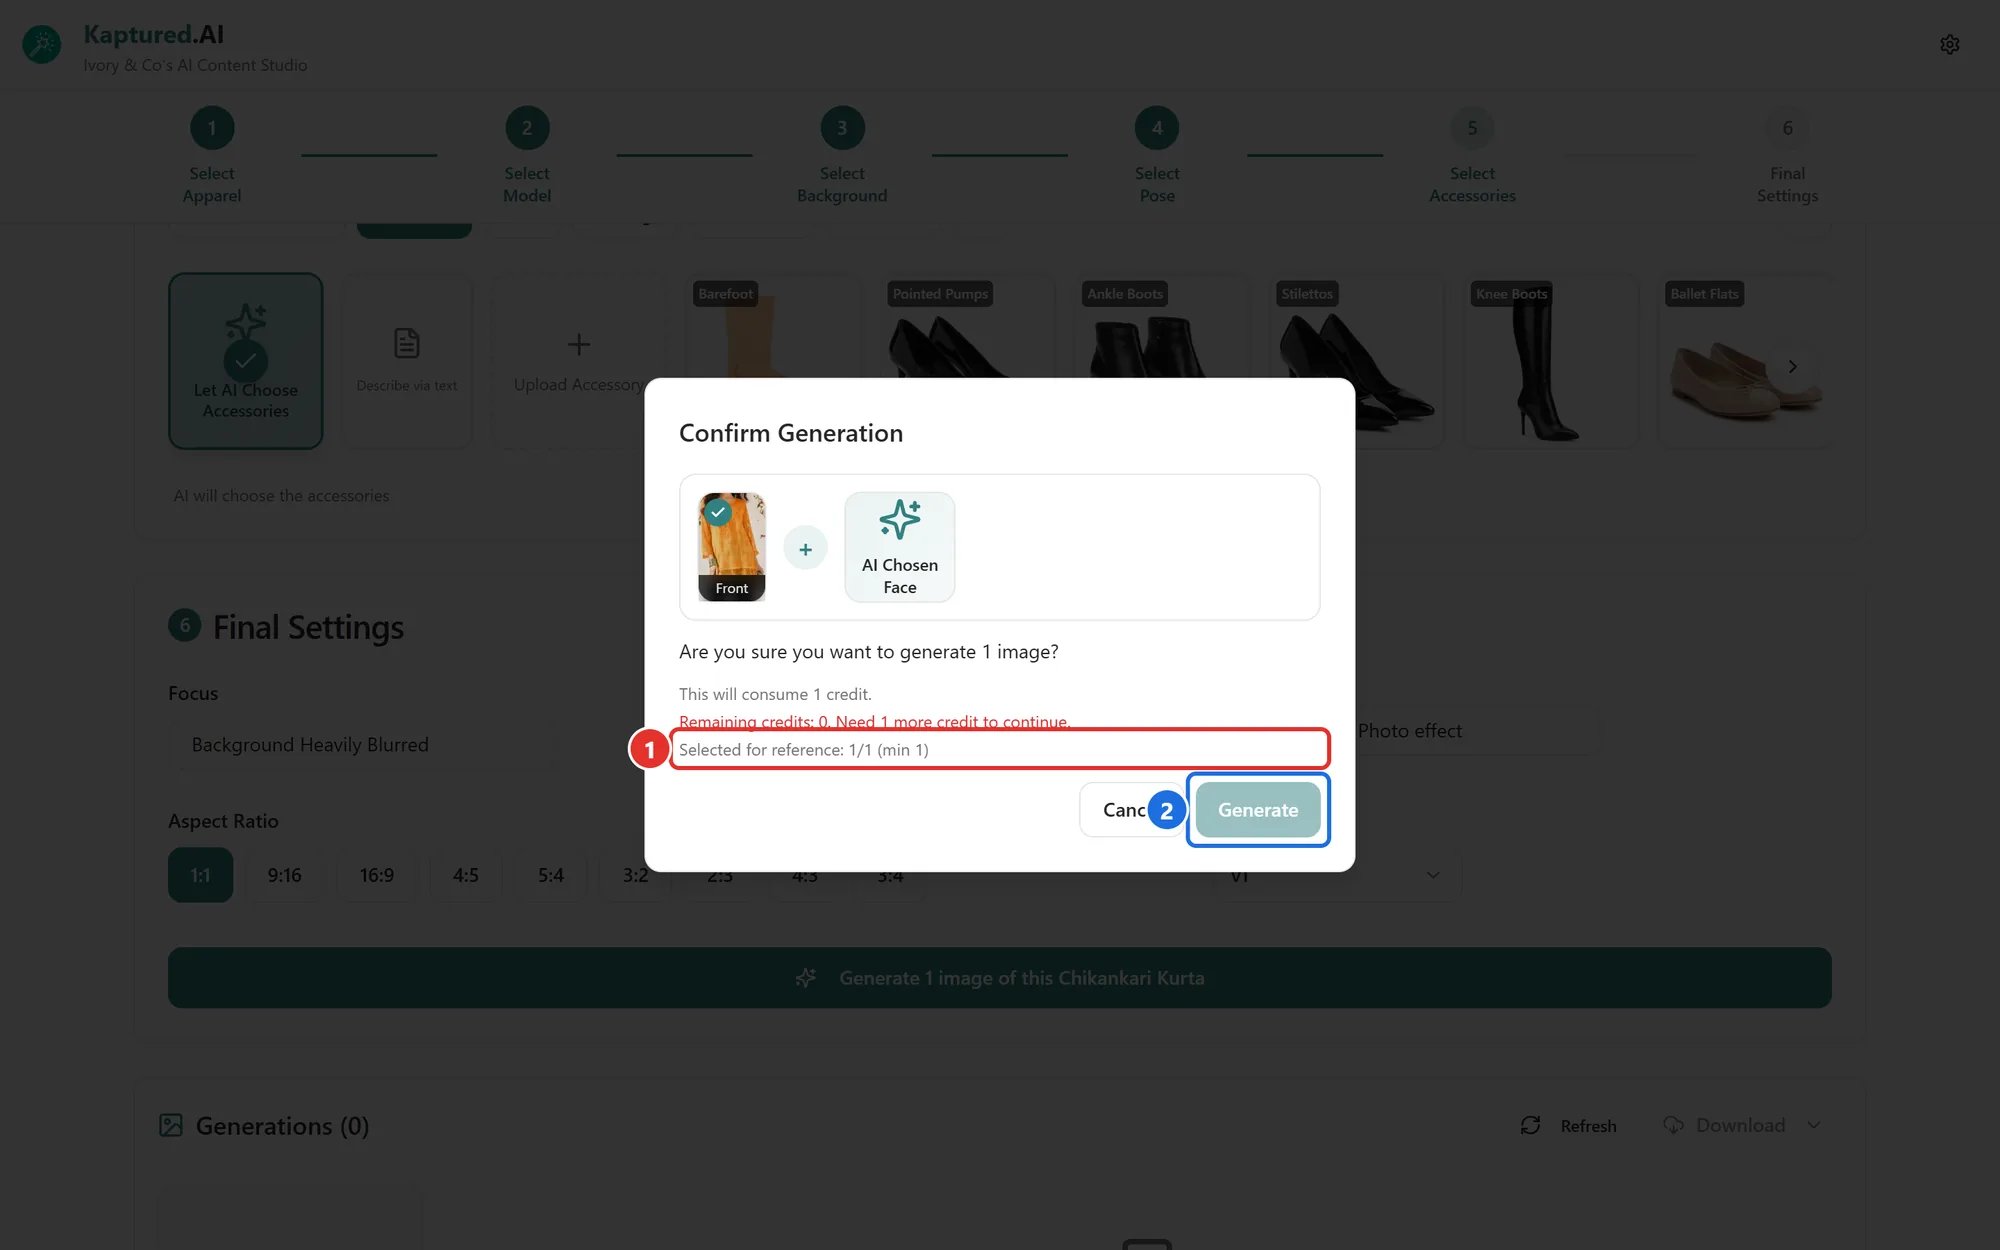
2. The **Confirm Generation** dialog shows how many credits it will use. Under **Selected for reference** (1), untick any product photos you don't want the AI to look at; at least one must stay ticked.
3. Click **Generate** (2).
A row of steps (1) sits at the top of the page. Click any step to jump to it. Which steps you see depends on your [Shop Category](/getting-started/platform-overview/shop-settings#shop-category):
| Shop | Steps |
| -------------- | ----------------------------------------------------------------------------------------------------- |
| Apparel | Select Apparel → Select Model → Select Background → Select Pose → Select Accessories → Final Settings |
| Jewelry | Select Jewelry → Select Template → Select Model → Select Accessories → Final Settings |
| Other products | Select Product → Select Model → Select Pose → Select Accessories → Final Settings |
Under the steps is **Generations**, where your results appear.
## Step 1: Select your product
Choose **Single Product Shoot** and click a product. You can search with **Search products...** (4), filter by category, color or size with the filter button, or jump to your newest with **Go to Latest Product**.
To shoot up to 3 products together on one model, use **Multi Product Shoot** (3). See [Group Shots](/ai-photo-studio/group-shots).
### Try a product without saving it
Click **Add Temporary Product** (2), choose photos, then fill in **Product Name**, **For** and **Category** in **Temporary product details**. Temporary products work like normal ones in the studio but aren't saved to your catalog.
## Step 2: Select a model
Pick a face from the model library (filter by **All**, **Male**, **Female** or **Kids**), let the AI choose, or upload your own. Adjust age, hairstyle and makeup under **Face Styling**. See [Choosing a Model](/ai-photo-studio/choosing-a-model).
## Step 3: Select a background (clothing)
Browse around 90 backdrops in **Studio**, **Outdoor**, **Festive** and **Indoor**, describe one in words on the **Text** tab, or upload your own. See [Backgrounds and Poses](/ai-photo-studio/backgrounds-and-poses).
Jewelry shops pick a **Template** here instead. See [Jewelry Templates](/ai-photo-studio/jewelry-templates).
## Step 4: Select a pose
Pick a pose by view (**Front**, **Side**, **Back** and so on), use one of your saved pose styles, or describe one. Choose an expression: **Neutral**, **Smiling** or **Laughing**. See [Backgrounds and Poses](/ai-photo-studio/backgrounds-and-poses).
## Step 5: Select accessories
Add footwear, bags, earrings and more, or click **Let AI Choose Accessories**. See [Accessories](/ai-photo-studio/accessories).
## Step 6: Final settings
Choose focus, lens look, **Aspect Ratio** and **Image Engine**. The engine and resolution decide the credit cost. See [Final Settings and Image Engines](/ai-photo-studio/final-settings-and-image-engines).
## Step 7: Generate
1. Click **Generate 1 image of this {product}**. (With several engines selected, you get one image per engine.)
2. The **Confirm Generation** dialog shows how many credits it will use. Under **Selected for reference** (1), untick any product photos you don't want the AI to look at; at least one must stay ticked.
3. Click **Generate** (2).
 You see **Image is generating. We'll notify you once it's ready. You can keep using the app.** A **Creating Magic...** card appears under **Generations**, and you get a notification (**Image Ready!**) when it's done, usually within a couple of minutes.
You don't need to wait. Start another generation, or switch products, while the first one runs.
## Step 8: Review, edit and download
Click the new image to open it full screen. From there you can crop it, edit it with a prompt, apply Magic Edit, turn it into a video, or download it. See [The Image Viewer and Downloads](/editing-and-video/viewer-and-downloads).
Each product's **Generations** row keeps every image and video made from it. Everything also appears in the [Library](/library/library-overview).
## Related articles
* [Final Settings and Image Engines](/ai-photo-studio/final-settings-and-image-engines)
* [Generation Troubleshooting](/ai-photo-studio/generation-troubleshooting)
* [Editing Images with AI](/editing-and-video/editing-images)
* [How Credits Work](/subscription-and-billing/credits-explained)
You see **Image is generating. We'll notify you once it's ready. You can keep using the app.** A **Creating Magic...** card appears under **Generations**, and you get a notification (**Image Ready!**) when it's done, usually within a couple of minutes.
You don't need to wait. Start another generation, or switch products, while the first one runs.
## Step 8: Review, edit and download
Click the new image to open it full screen. From there you can crop it, edit it with a prompt, apply Magic Edit, turn it into a video, or download it. See [The Image Viewer and Downloads](/editing-and-video/viewer-and-downloads).
Each product's **Generations** row keeps every image and video made from it. Everything also appears in the [Library](/library/library-overview).
## Related articles
* [Final Settings and Image Engines](/ai-photo-studio/final-settings-and-image-engines)
* [Generation Troubleshooting](/ai-photo-studio/generation-troubleshooting)
* [Editing Images with AI](/editing-and-video/editing-images)
* [How Credits Work](/subscription-and-billing/credits-explained)